
If you’re looking to reach more of your ideal customers on Facebook and Instagram, you’ll need to understand how to use Meta Business Suite, set up your Meta Business Portfolio, and prepare to run Facebook and Instagram ads. In this post we'll give you a crash course in everything you need to know about setting up and organizing your Meta Business Portfolio for success.
 Meta doesn’t always make things easy for business owners, so we’ve done our best to create an exhaustive (but not exhausting!) guide to creating or accessing an existing account. Depending on your business’s prior experience with Meta and its tools, you may not need to read the entire post. Refer to the table of contents below to skip straight to the section that’s right for your stage in the process!
- What is Meta Business Suite?
- What Can You Control With Business Suite?
- Why Should You Use Meta Business Suite?
- How to Access or Set Up Meta Business Suite
- I Want to Run Meta Ads… What’s Next?
- How to Give Agency Access to Meta Business Suite
We won't turn this into a manifesto, but here's the big idea: your business's social media accounts are valuable assets, and they deserve professional care. Just like your brand kit, your email list, or your website, your social media is an important way to reach your audience — and it deserves the same attention. Platforms are continuing to adapt to better serve businesses, and Meta Business Suite is one of those adaptations.
Whether you're selling products, fundraising, or just trying to get the word out, this guide will walk you through everything you need to get set up and ready to grow. We've done our best to make it as straightforward as possible, so even if you're starting from scratch, you'll know exactly what to do and where to go.
What is Meta Business Suite?
Meta Business Suite is Meta’s central platform for managing your business presence on Facebook and Instagram. It lets you manage pages, Instagram accounts, ad accounts, messages, permissions, billing, pixels, and reporting–all from one place. Think of it like the back end of your website: only you as a business owner, your trusted employees, and any approved agencies or business partners have access to Business Suite.
What Can You Control with Business Suite?
While Meta Business Suite started with Facebook, today it serves as a central hub for managing your business’s presence across Facebook, Instagram, ads, messaging and other Meta tools. Here’s a list of all the business assets that can be controlled through your Meta Business Suite.
- Facebook Pages: You can manage multiple business pages here, whether they are multiple locations for a store or completely different businesses.
- Ad Accounts: If you want to run paid social media ads on Facebook and Instagram, this is where you’ll find ad campaigns, audience targeting, and reporting.
- Instagram Accounts: Connect your Instagram business profile to manage it alongside your Facebook Page. From here, you can publish posts, respond to messages, run ads, and view insights across both platforms in one place.
- Commerce Manager: Here, you can manage product catalogs and shop settings for Facebook and Instagram, making it an important tool for social ecommerce.
- Pixels: These are the little snippets of code that can track the interactions between social media and your website.
- So Much More: Though the above are the main elements, Meta Business Suite can also be used for app management, WhatsApp accounts, CRM Integration, and more.
Why Should You Use Meta Business Suite
For the sake of your business and your personal life, you need some work/life separation. If you’ve been managing your business’s Facebook and Instagram pages through your personal account, you may not only be jeopardizing your privacy and blurring the lines between work and play, but you could also be limiting the tools available to your business.
Think of Meta Business Suite like a bank. Without it, you’re keeping your business’s social media assets in your wallet like cash…or worse, loose in the pockets of favorite winter jackets and pairs of pants, not to be seen again until spring or accidentally donated to Goodwill.
When you use Meta Business Suite, you bring all those assets into one safe place. You have stronger reporting and tracking tools available to you, cleaner access controls, and better visibility into how your Facebook and Instagram marketing is performing. You can control who has access to each individual element and what type of actions they can take.
If you want to turn social media into a true business asset, you need to have a Business Suite. The next step is just to figure out how.
How to Access Meta Business Suite
Oftentimes, Meta will automatically create a Business Suite account when you set up a business page on Facebook or an Instagram business account. You may already be using Meta Business Suite, or have an account that you didn’t know existed!
If you are the person who created the original Facebook page or Instagram account, you can find out if you have a Meta Business Suite account by logging in through facebook.com/business/tools/meta-business-suite.
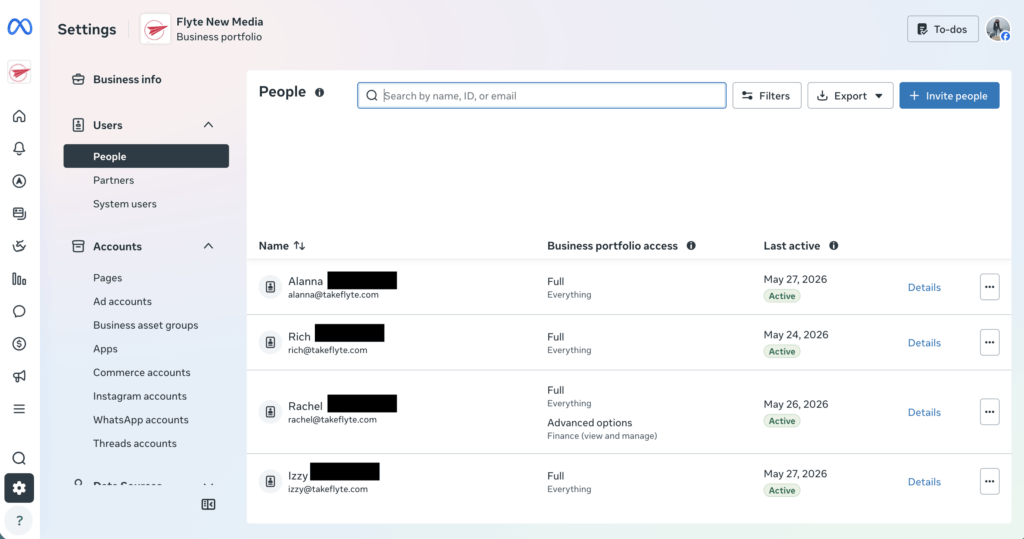
If you have access to an account, your screen might look something like this upon logging in:
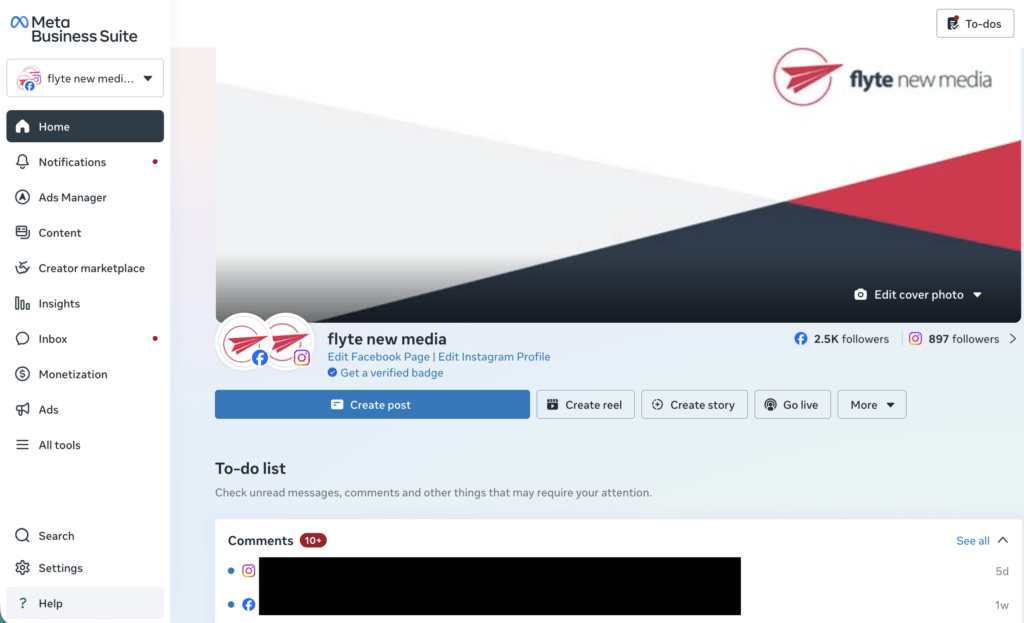
You can see on the left that our business name, flyte new media, appears at the top. This is the homepage or ‘feed’ page that will often appear when you enter a Business Suite account. If you don’t see this, it may mean you don’t have access to the Meta Business Portfolio yet, or that a portfolio has not been created for your business.
I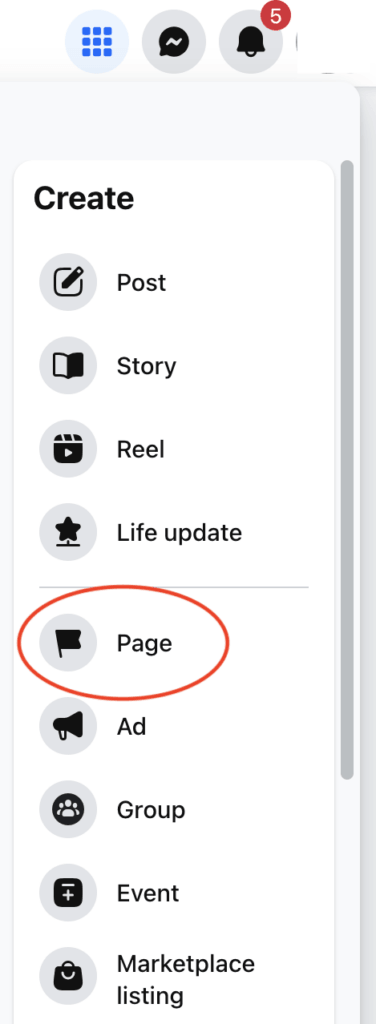 f you don’t have access to Meta Business Suite yet because your business does not have a Facebook Page, you’ll need to create the Page first. This is the public-facing profile for your business on Facebook. It’s where people can find your business, see your basic information, follow your updates and interact with your content.
- To create a Facebook Page, log into your personal Facebook account, open the menu, and select Pages.
- From there, choose the option to create a new “Professional” Page and follow the prompts to add your business name, category, bio, contact details, and other basic information.
- Don’t worry about getting every detail perfect right away. Start with the essentials, like your business name, category, profile image, cover image, contact information, and website URL. You can continue refining your Page after it’s created.
Once your Facebook Page exists, you’ll be ready to access Meta Business Suite and connect the rest of your business assets. We’ll cover how to check access, manage your business portfolio, and give the right people the right permissions in the next sections.
Who Has Full Control of My Meta Business Portfolio?
If you’re not sure who set up your Meta Business Portfolio, the better question may be: who has full control?
Meta Business Suite no longer works like a simple ‘one-owner’ setup, which can be confusing when you’re trying to figure out who’s actually in charge. Instead, people can be added to a business portfolio with different levels of access. Someone with full control can manage business settings, assign access to other people, connect or remove assets, and make important account-level changes. Someone with partial access may only be able to work on specific assets, like a Facebook Page, Instagram account, ad account or Pixel.
This is why it’s so important to know who has full control of your business portfolio. If the only person with full control leaves the company, loses access to their Facebook account, or no longer works with your business, it can be difficult to manage your Meta assets later.
- Check your current access in Meta Business Suite: Go to Meta Business Suite, open Settings and look for People in the left-hand menu. If you can see this section, review who has access and what level of permissions they have.
- Look for anyone with full control: Review the people listed in the account and check their permission levels. Ideally, your business should have at least two trusted people with full control so access does not depend on a single person.
- If you can’t see the People section: You may not have full control of the business portfolio. Start by contacting current employees, former employees, contractors, volunteers, or past agency partners who may have helped set up your Facebook Page, Instagram account, ad account, or Business Portfolio.
- Ask them to check facebook.com/business/tools/meta-business-suite. Have each person log in to business.facebook.com and check whether they have access to the business portfolio, Facebook Page, Instagram account, or ad account. If someone does have full control, ask them to add the appropriate person from your organization.
- Add backup access once you get in: Once someone from your organization has full control, add at least one other trusted person with full control for redundancy. This helps prevent future access issues if someone leaves the company or loses access to their personal Facebook account.
- Request help from Meta if no one has access: If you can’t identify anyone with full control, you may need to request help from Meta. Depending on the situation, Meta may allow you to request full control of a business portfolio or submit a Page admin dispute. Be prepared for this process to take time, and know that Meta may ask for documentation to confirm your connection to the business.
- Consider starting fresh only as a last resort: If no one can access the existing setup and Meta cannot restore access, you may need to create a new Facebook Page or business portfolio. This is not ideal, especially if your existing Page has followers, reviews, ad history, or useful data attached to it, but it may be the only practical option.
Once you do have access, protect it. Everyone who has access to your Meta Business Suite is a potential unlocked door. Losing control of your business account can mean losing access to your ad history, your audience data, and your ability to run campaigns. Make a habit of reviewing permissions regularly and removing anyone who no longer works with your business, whether that's a former employee, a freelancer, or an agency you've moved on from.
I Need a New Meta Business Portfolio
If you’ve determined that you don’t yet have a Business Portfolio for your page(s), or you’re just getting started with Meta and haven’t made a Facebook or Instagram page yet, the process is quite simple.
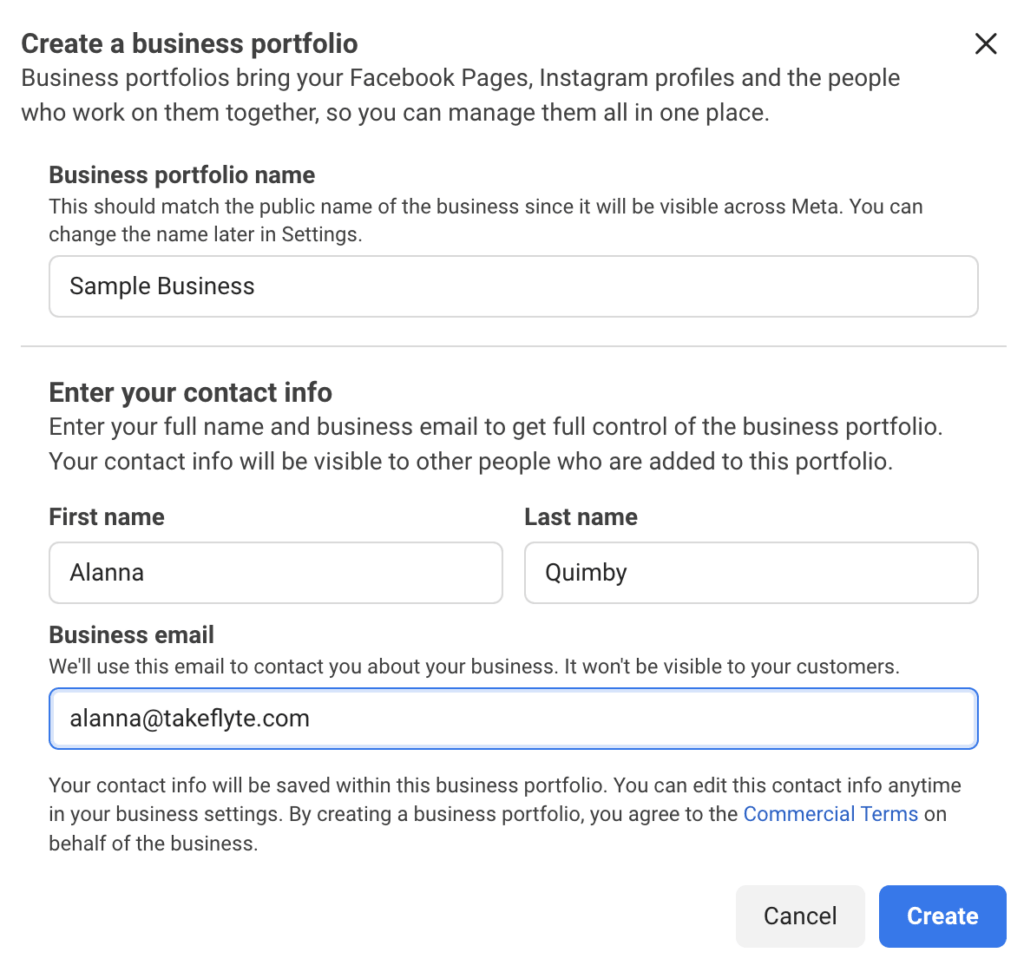
On facebook.com/business/tools/meta-business-suite follow the prompts after clicking “Create Account.” When you choose an email address, it’s good practice to use one that is accessible by multiple people. For example, instead of entering my employee email address: alanna@samplebusiness.com I would enter a contact address: info@samplebusiness.com. That way, you have a safety net in place if an individual employee is out sick, leaves the company, or otherwise can’t access their email.
I Want to Run Meta Ads…What’s Next?
Congrats, you’re in! Now you need to add your different social media assets into the account and give access to the appropriate employees and partners.
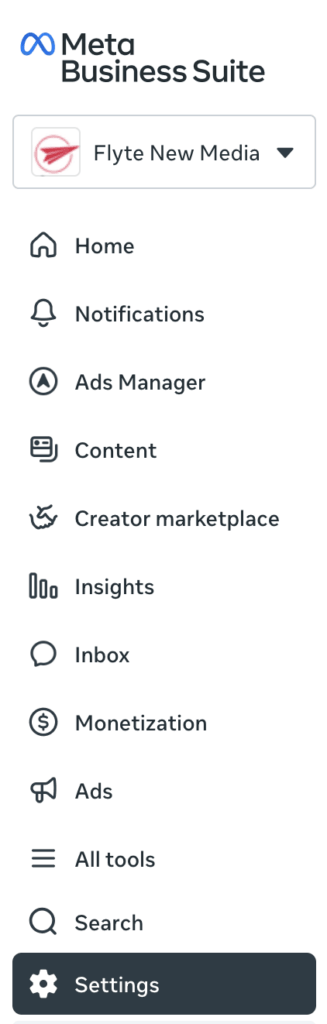
Click the three-line menu in the top left corner to expand the full list of tools. Meta’s interface changes often, so the exact placement may vary, but most setup steps will begin from this menu or from Business Settings.
If you came to Meta Business Suite to run social media ads, or to give an agency like flyte access to run them for you, this is where the runway starts. You’ll need to complete the following setup steps before campaigns can take off.
How to Claim Your Facebook Page
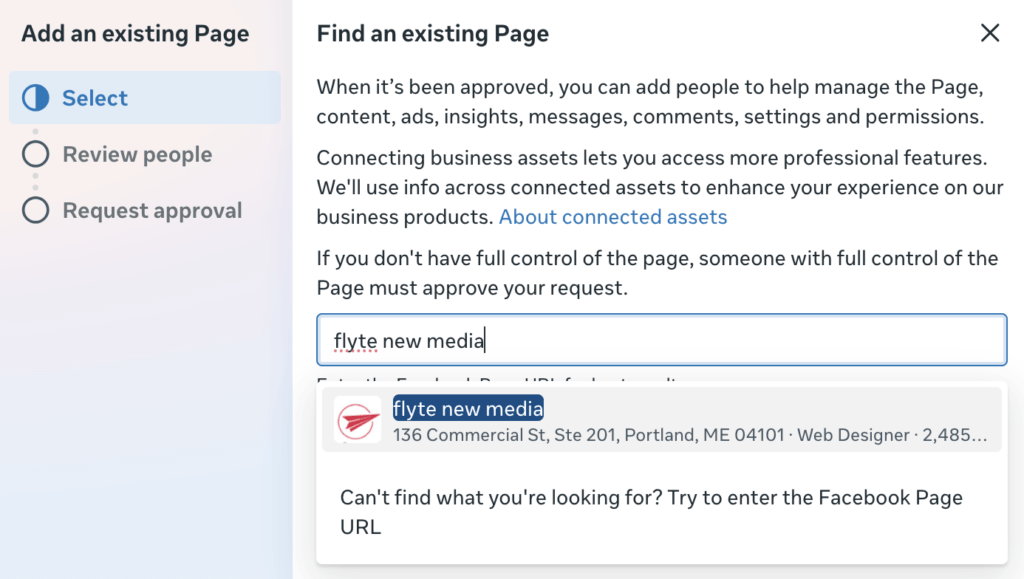 Your Facebook Page is the keystone of your Meta Business Suite. Select settings and then find “Pages” under the accounts tab in the menu. After selecting the blue +add button, you’ll be prompted to add a page in one of three ways:
- Add an existing Facebook Page
- Request shared access to a Facebook Page
- Create a new Facebook page
We’ll focus on the first and third options. If you have a Facebook Page for your business, use the first choice and search for your page.
If you’re new to Facebook for Business, use the third option to start the process of creating a brand new page. Don’t worry about getting everything perfect right away, just fill out the basic info to get started.
Connecting Your Instagram Account to Business Suite
This will be important for businesses that are interested in running ads on both Facebook and Instagram. To connect your Instagram, you’ll need to already have an Instagram account set up as a business profile. If you haven’t done that yet, follow Instagram’s guide to set up your business account first.
Once your Instagram business profile is ready, open Business Settings in Meta Business Suite and look for Instagram Accounts under your account or asset settings. From there, select add and follow the prompts to log in and connect your Instagram business profile.
Once connected, your Instagram account can be managed alongside your Facebook Page for publishing, messaging, advertising and reporting.
Setting Up Your Ad Account
 This may be your first time running Meta ads, or you may have boosted posts in the past. Either way, setting up an ad account inside your Meta Business Portfolio gives you a cleaner setup for managing campaigns, permissions, billing and reporting.
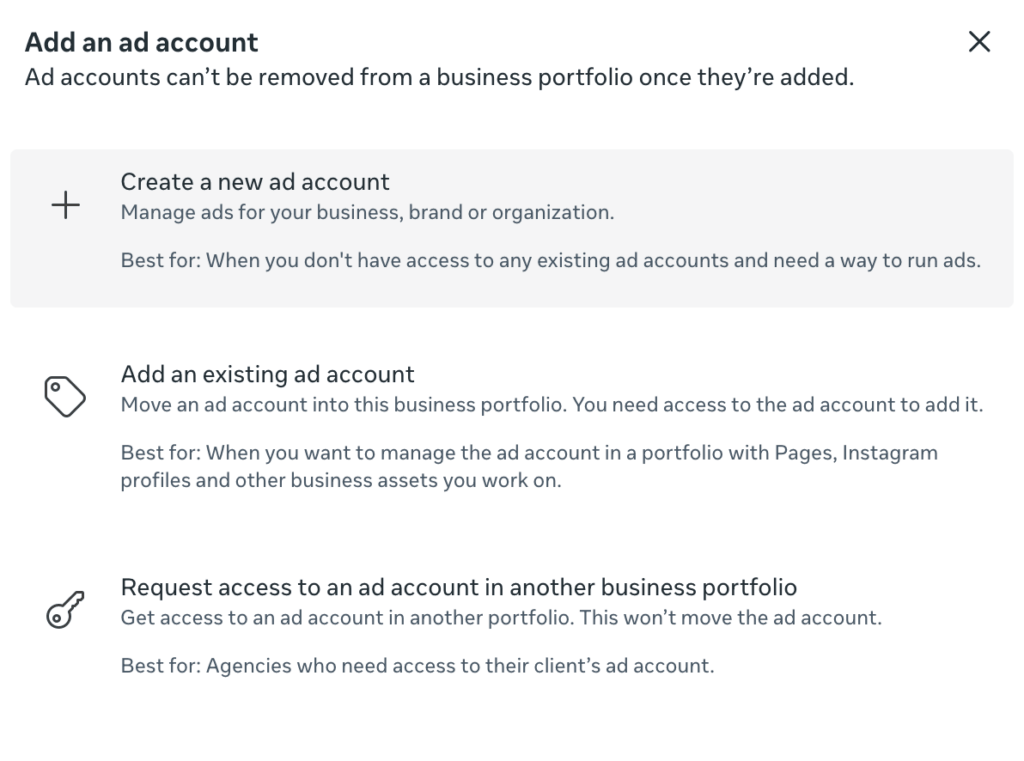
To connect an ad account, open Business Settings in Meta Business Suite and look for Ad Accounts under your account or asset settings. From there, you’ll typically have the option to create a new ad account, add an existing ad account, or request access to an ad account.
If you’re setting up ads for your own business, choose the option to create a new ad account and follow the prompts. Pay close attention when selecting your currency and time zone, as these settings may not be easy to change later.
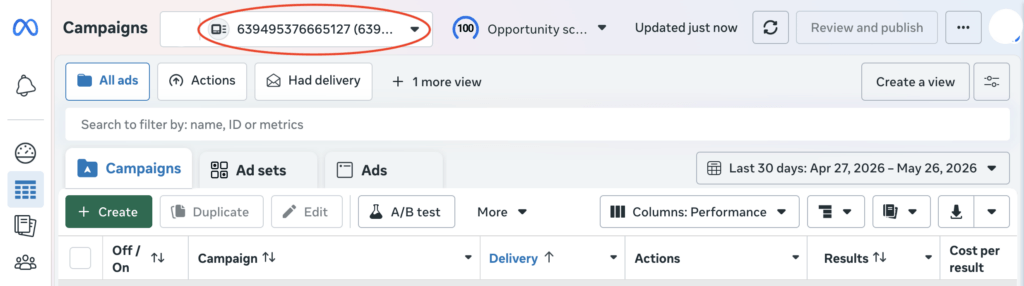
If you’ve boosted posts or run ads from your personal Facebook account in the past, you may already have a personal ad account. In that case, you can choose the option to add an existing ad account to your Business Portfolio instead of creating a new one. Meta may ask for the ad account ID, which you can find in Ads Manager.
Just keep in mind that once an ad account is added to a business portfolio, it may be difficult or even impossible to remove it later. Therefore, make sure you’re adding the correct account before moving forward.
Once the ad account is created or connected, Meta may prompt you to add people and set permissions. You don’t need to add everyone right away, but it’s a good idea to make sure at least one trusted person has full control so your business does not lose access later.
 Adding a Payment Method
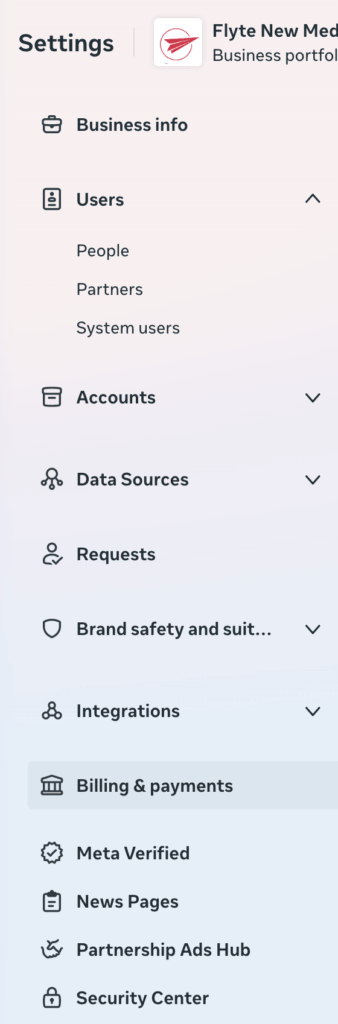
To run ads through your new account, you’ll need to add a payment method. In Meta Business Suite, click the three-line menu in the top left corner, then select Billing & Payments. From there, choose Payment Methods and follow the prompts to add a credit card or other accepted payment method.
If you’re starting with a new ad account, don’t be surprised if Meta charges your payment method in small increments at first, often around $1 to $5. This is common for newer ad accounts as Meta builds trust with the payment method. As payments are successfully processed over time, your account’s payment threshold typically increases, which usually means fewer small charges and more predictable billing.
It’s a good idea to add your payment method before your planned ad start date. You may also want to alert your bank or credit card provider that small charges from Meta or Facebook may be coming through soon. These charges can sometimes be flagged as suspicious, which may place your payment method on hold and delay your ads from running.
Creating a Meta Pixel
Meta Pixel is a small piece of code added to your website that helps Meta understand what people do after they click on one of your Facebook or Instagram ads. For example, it can help track when someone views a page, fills out a form, adds a product to their cart, or completes a purchase.
You can use that data to better understand your audience, measure campaign performance, build remarketing audiences and optimize future ads.
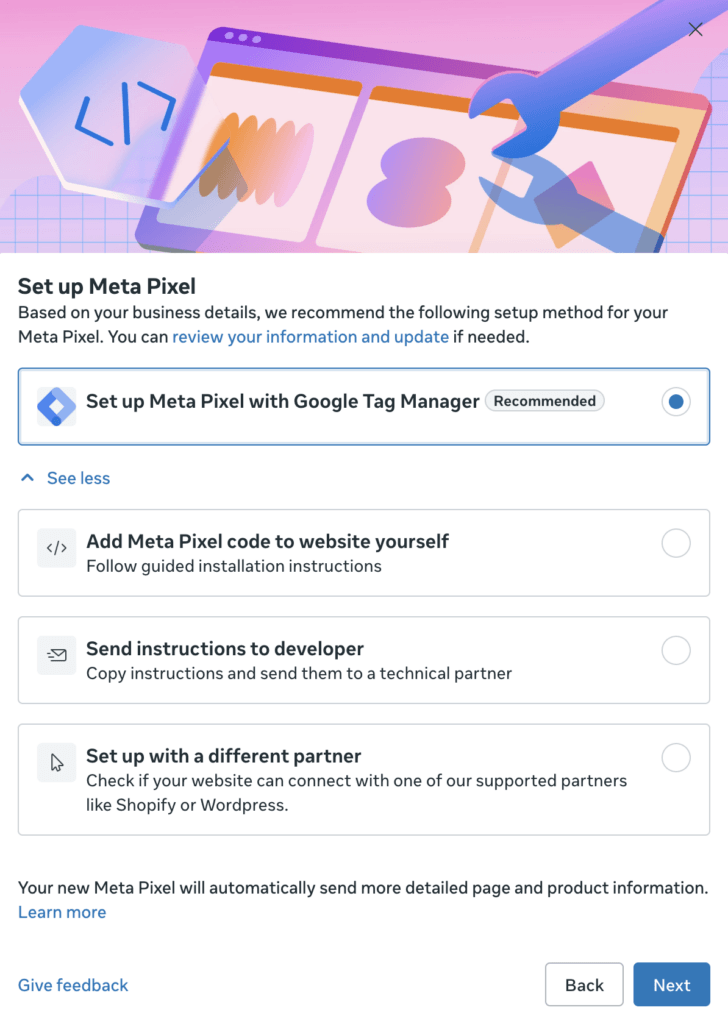
To create a Pixel, open Events Manager in Meta Business Suite and select the option to connect a new data source. Choose Web, then follow the prompts to create your Meta Pixel and connect it to your website.
Meta will then recommend a setup method based on your business details. You may see options like, “Set up Meta Pixel with Google Tag Manager”, “Add Meta Pixel code to website yourself”, “Send instructions to developer”, or “Set up with a different partner such as Shopify or WordPress.” If you already use Google Tag Manager, that is often the easiest installation path. If not, you can either add the Pixel code directly to your website, send the instructions to your developer, or connect through one of Meta’s supported website partners.
That said, the Pixel is now only one part of a strong tracking setup. Meta also recommends using the Conversions API, often called CAPI, alongside your Pixel. While the Pixel collects data through a visitor’s browser, CAPI sends information more directly from your website, server, CRM, or ecommerce platform to Meta. This can help make your tracking more reliable, especially as browsers and privacy settings continue to limit cookie-based tracking.
If you’re working with a developer or digital marketing agency, ask about setting up the Meta Pixel and Conversions API together. You don’t need to know every technical detail yourself, but it is worth making sure your tracking is set up in a way that gives you the clearest possible picture of your ad performance.
How to Give Agency Access to Meta Business Suite
If your head is spinning, you’re not alone! Meta Business Suite is powerful, but it’s not exactly built for stress-free setup. Social media ad experts from an agency (like flyte new media) can help you accomplish your marketing goals with far less stress…but first you’ll need to provide access to your account and social assets.
Adding a Business Partner
 Find “Partners” under “Users” in the left-hand menu and select the option to “Give a partner access to your assets.” From there, enter the agency’s business ID.
A pop-up will appear where you can select the assets that you would like to give them access to. Use the menu on the left to find each asset and select the permissions your agency needs. For example, they may need access to your Facebook Page, Instagram account, ad account, Pixel or dataset, and Catalogs if you sell products through Meta. Your agency can tell you which permissions are required based on the work they’ll be doing.
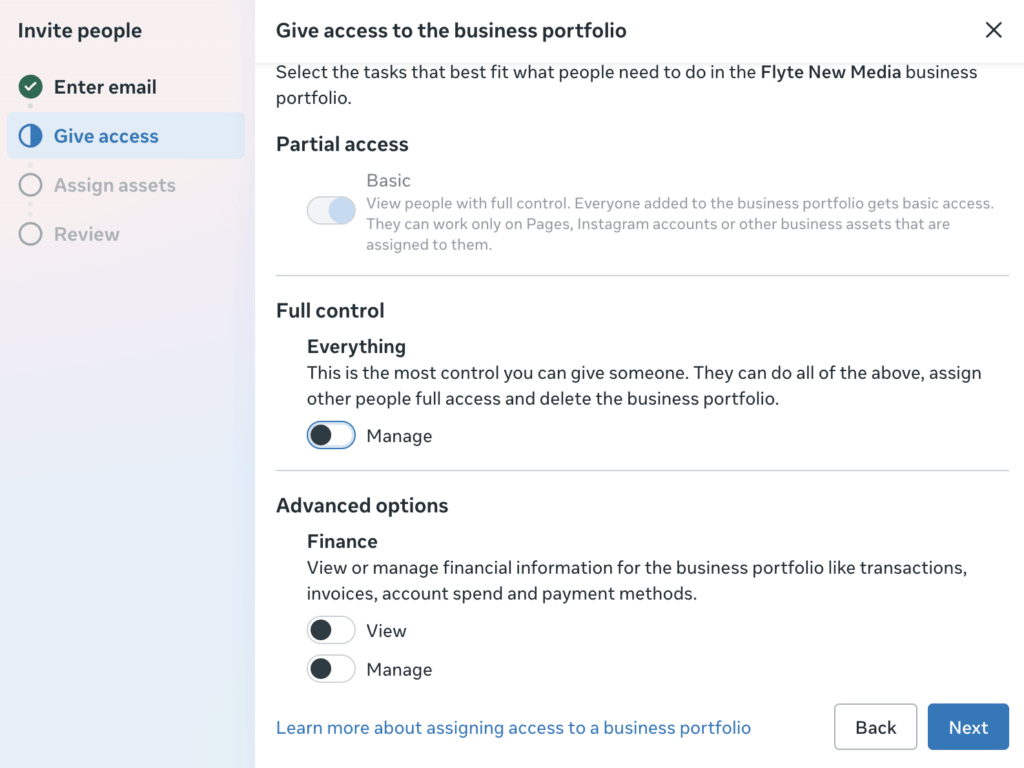
If you’re comfortable, you can grant full control for certain assets, which allows the agency to complete more of the setup process without needing to come back to you for every small change. If you’d prefer a more limited setup, partial access may be enough.
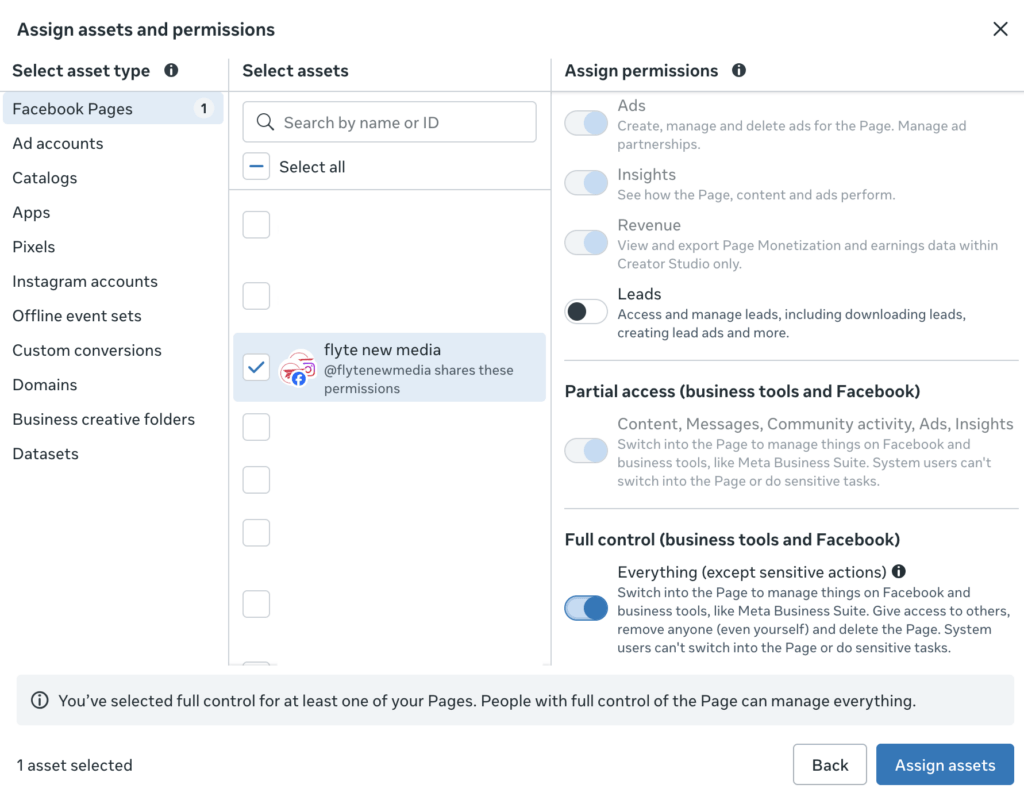
Once you’ve selected all the assets, click “Assign assets” at the bottom of your screen. On the next pop-up, select the first option to designate the partner as an agency, then click accept to finalize the process!
Adding Employees & Admins to Your Account
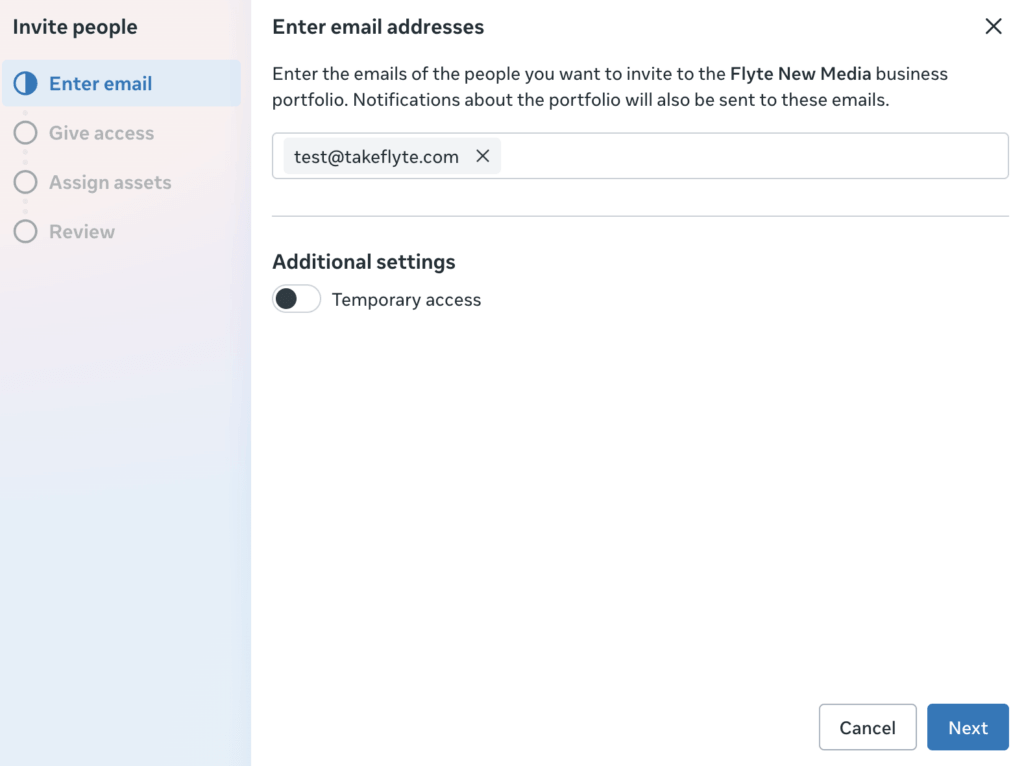
You can also add individual people such as employees or consultants by finding “People” under “Users” and using the blue “add” button. You’ll need to enter their email address and select which type of user they are on your account. Then you will go through the same process of assigning them individual assets as you did in the steps above.
Ready to Start Connecting With Your Audience With Social Media Ads?
Phew! Are we the only ones a little out of breath? The good news is, you are now ready for the fun stuff! Start discovering audiences, building ad creatives and connecting with potential customers.
Need help getting your Meta Business Suite, ads, and tracking ready for takeoff? Let’s chat. flyte can help you clean up your account setup, launch smarter Facebook and Instagram ad campaigns, and build a social media strategy that supports real business growth.

Alanna is a digital marketer who thrives on balancing big-picture thinking with detailed execution, continuously optimizing campaigns to improve efficiency and impact. For her, marketing is about making thoughtful connections and creating work that truly resonates with the audience.
Originally from Maine, Alanna spent much of her childhood in Florida before returning to her home state in 2024. Outside of work, you can often find her browsing a bookstore, spending time outdoors, or catching up with friends and family.


